Pages

Wednesday, December 9, 2020

Advanced Test Management - TestRail™

If you are looking for an advanced test management tool over testlink, I have found an outstanding solution from Gurock Software. Unlike testlink, this is not a freeware. But, it has all features that you expect from a test management tool. TestRail is a web-based test case management tool which enables to monitor, evaluate & organize software testing effort. In this article, I would like to discuss few main features, benefits and basic components of TestRail.


Main benefits of TestRail

  Organize test cases and test suits

  Mange test runs and report issues on the go

  Tracking test results

  Distribute test reports

  Boost testing productivity

  Tracking test progress


Key features of TestRail


  Add test cases or import test cases via xml, csv file.

  Create milestone and add test plans to the milestone.

  Create Test runs by including testcases.
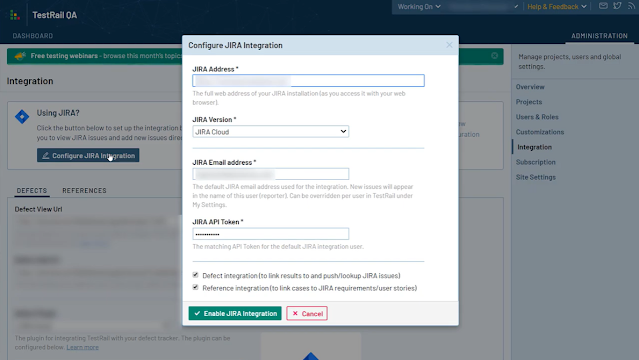
  Issue Tracker integration -  TestRail can be integrated with bugzilla, GitHub, JIRA, Mantis, Pivotal, LightHouse… etc. This helps to report and link issues to a testcase.

  Track progress of Test execution in every aspect.

  TestRail plugin to the JIRA – Using this plugin user can link the requirement (JIRA ticket) to the test case. On the other hand, requirement (JIRA ticket) shows all the relevant testcases within the story.

  Customizable & graphical interpretation of test reports.

Dashboard - Dashboard Overview
TestRail Dashboard view enables users to have an overview of their projects. ToDos, Project milestones, Recent Activities and graphical interpretation of test runs are the key features.


Note: for more information about ToDo and Milestone, see below sections "Milestone" and "ToDo"

Test Cases
Users are allowed to create testcases and testsuits here. Key features of TestRail – Test Cases section are,

  It enables to rearrange test cases between test suits (sections).

  Move and copy test cases between test suits or test projects.

  Customize test case templates.

  Estimate the time for each individual test case.

  Attaching files to the test case.

  Import testcases in csv or xml formats.

  ‘Tests and results’, ‘defects’ and ‘history’ of a particular test case can be monitored.

  Markdown options: (e.g **Bold** - two astricts before and after a text will bold your text.)


Hint: In a section (testsuit), group testcases by application modules or functional areas. (Not by product version or testing types)

Test Runs and Results
Test Runs and Results section helps users can perform a test run prior to software release & obtain the test result. Key features of TestRail – Test Runs and Results section are,
Add Test Run

  Assign test run to particular users

  Attach a milestone to the test run

  Select all or specific test cases to the test run, based on selected criteria. (e.g: high priority test cases)

Execute Test Run and Result

  Execute the test & Add test result (e.g: Passed, Failed, Blocked, Retest)

  Report test execution time

  Report bugs relate to Test case into an integrated bug tracking tool (e.g: JIRA)

  Email, Print or Export (in xml or csv format) test result

Add Test Plan

  Add a test plan (collection of test runs) to group test tuns

  Attach a milestone to the test plan

  Add configurations (e.g: browsers or OS) to a test plan


Defect Integration
Testrail allows administrators to integrate to an issue tracking tool. (e.g: JIRA) After integration has done “Test runs and Results” section allows users to,

  Push (link) details from Test result to the JIRA story.

  Add a new bug in JIRA instantly.

Also, the ‘References’ section under “Test Cases” section allows users to,

  Link JIRA stories (requirements) to the particular test case.


Milestone

  User can use milestone to separate releases

  User can set start and end date to a milestone

  User can assign the milestone to a test run or test plan

ToDo
ToDo represents an individual task for each member of a test team. Administrator (Test Lead) can assign tests to members of test team.


Reports
There are a lot of overview charts are available within the each section (Milestone, Test run and results, test cases, defects, activities). For additional reporting options, Testrail facilitates various types of customizable reports. Few examples are shown below.

  Milestone Report

  Workload Summary

  User can assign the milestone to a test run or test plan

  Defect Report

  Coverage Report

  Activity Report

  … etc

Few other features of Testrail reports are, 

  User can set access permission of their customized reports

  User can schedule a test report to generate regular basis.

  User can print, download or email reports.


Tool Comparison – TestLink Vs TestRail


Here is the list of advantages of TestRail over TestLink.

  Testrail interprets real time testing progress. Also, it enables editing tests during a test run. But, Testlink cannot do the same.

  Testrail has a JIRA plugin that can use to monitor test progress within the JIRA.

  Testrails allows to Clone Tests between projects and TestLink doesn’t.

  Testrail allows batch operations (cloning, editing, deletion)

  Testrail has a advanced reporting module over testlink. Customizable reports, dashboard graphs and schedule reports you can only fine in Testrail.

  Testrail provides both cloud and on-premise while Testlink doesn’t support cloud.

  Testrail help Taskboards, which is a great help to an agile team. But, Testlink doesn’t have Taskboard facility.

  Since Testrail is a commercial Tool, it has wide support and service. But a freeware like Testlink doesn’t.

References

https://www.gurock.com/testrail/

http://testlink.org/

http://qasrilanka.blogspot.com/2014/10/test-management-with-testlink.html

https://www.youtube.com/channel/UCaCU2W8q6eYOPpdxcFKfCVA

{ Read More }


Wednesday, December 26, 2018

Automation Made Easy With Katalon

Today I'm going to introduce a new automation tool - Katalon!

Katalon is a combination of 3 products.
   1. Katalon Studio
   2. Katalon Analytics
   3. Katalon Recorder

Katalon Mobile Testing Solution

Katalon provides complete automation solution for API, Web, and mobile testing in an easiest way you would ever imagine. It’s easy, fast, flexible and most importantly it’s Free!!! you can only test an iOS application using macOS. So, for today, from this article I would like to discuss how to start android testing with Katalon. 
To start Android testing, It requires Appium 1.6, 1.7 or 1.8 (Appium 1.9 is not supported at the moment) Also, it needs Android 6.x or 7.x.

Installation
  • First, download Katalon studio from below link. https://www.katalon.com/download/
  • Make sure you install Node.js (download windows installer) into a location where you have full Read and Write permissions. Make sure “Add to Path” is enabled when installing. 
  • Check whether node installed correctly
    • : node -v
    • : npm -v
  • Install Java (if not already installed)
  • Install .NET Framework 2.0 SDK (if not already installed)
  • Install Appium
    • : npm uninstall -g appium
    • : npm install -g appium or  : npm install -g appium@1.8.1
  • Check if Appium installed correctly
    • : appium -v
    • : where appium

Configuration
  • Open Katalon.exe
  • Connect Appium to Katalon studio – Go to Windows > Katalon Studio Preferences > Katalon > Mobile  - Browse the correct Appium directory (Example - C:\Users\nishantha\AppData\Roaming\npm\node_modules\appium)

Setup android mobile device
  • Turn on the phone’s developer mode (go to Settings > Developer options > turn on ‘USB debugging’)
  • Connect your Android Phone to your computer via a USB cable. Just confirm if prompted to accept/trust the device
  • Install Android SDK: Katalon Studio will detect and ask you to install Android SDK automatically if your current machine doesn’t have it. Please allow Katalon Studio to install it in this case.
  • Check connection
    • : cd C:\Users\nishantha\.katalon\tools\android_sdk\platform-tools
    • : adb devices

Build your First Test
  • File > new sample project > new sample android mobile test project (Default project location - C:\Users\nishantha\Katalon Studio)

  • You will get a folder structure like this way;


  • Now, it's time for your creativity. just play with it. you can either use 'Mobile Object Spy' or 'Mobile Recorder' to capture objects and organize basic actions.


manual mode

script mode

  • As you can see above, you can use either manual mode or script mode to develop your automation script. please enjoy!!!

{ Read More }


Wednesday, August 2, 2017

Appium with Selenium Robot framework

When we get to the topic of Native & Hybrid automation, Appium is one of a great solution I have ever found. It’s an open source test automation framework that drives iOS, Android, and Windows applications.

Appium support any automation framework and can be use with any programming language. So, if you are good with Selenium Robot framework, get ready to develop your first automation script after reading this blog.
Note - This article is focus on android automation. 


Installation...

    • add 'tools' and 'platform-tools' folders to PATH variable

  • Install the latest Appium library (robotframework-appiumlibrary 1.4.4) from https://pypi.python.org/pypi/robotframework-appiumlibrary/
    • > pip uninstall robotframework-appiumlibrary  (To uninstall previous version of appium library (if any))
    • > cd C:\Python27\Scripts\robotframework-appiumlibrary-1.4.4 (Go to the directory which include appium library)
    • > python setup.py install
Launch Application using Appium...
  • Execute 'Appium.exe' to launch Appium
    • Set Application path & other parameters.
    • Click 'Run' button in the top right hand corner to start Appium server & Launch the application using attached device or emulator.

 Connect AVD (Android Virtual Device) or Real device...

  • If you are connect a real device, use 'adb devices' command to get the deviceName. (adb is located inside the 'platform-tools' folder) deviceName is one of the Appium server capability which is used with 'Open Application' keyword in your robot script. you will learn these keywords and capabilities later. 
  • If use don't have a actual device, then you should boot a AVD (Emulator) with API Level 17 or greater. see above image. you can see 'Launch AVD' parameter.
       How to create an AVD ?
  • Open 'AVD Manager.exe' which is located inside the SDK folder (..\AppData\Local\Android\sdk)
  • Create a new AVD

Locating elements in Android apps...

  • 'uiautomatorviewer' is a great tool comes with SDK that helps to get element's XPath, ID, Name And className. it is located inside the tools folder. (..\AppData\Local\Android\sdk\tools)

Take the above image. Few examples of how to locate the serverIP text field are given below.
  • Locating element by resource-id : id=com.qmatic.concierge:id/et_ip
  • Locating element by class and resource-id : xpath=//android.widget.EditText[contains(@resource-id,'com.qmatic.concierge:id/et_ip')]
  • Locating element by class and index : xpath=//android.widget.EditText[@index='1']
Write your first code...
*** Settings ***
Documentation This resource file contains global variables and keywords
... [Author]  Nishantha Thilakawardana

Library           AppiumLibrary 20


*** Variables ***
${REMOTE_URL}                   http://localhost:4723/wd/hub
${PLATFORM_NAME}          Android
${PLATFORM_VERSION}    6.0.1
${DEVICE_NAME}                 Galaxy Tab S2
${APP}                                         F:\\Projects\\Orchestra_Mobile_Connect_Concierge-1.1.1.7.apk
${TIME OUT}       20 sec
${Retry_Int}        3 sec

*** Test Cases ***
Concierge_Login
    [Documentation]    Android Automation for MobileConnectConcierge
    [Tags]    demo

    submit system settings

*** Keywords ***
submit system settings
    Open Application  ${REMOTE_URL}  platformName=Android  platformVersion=${PLATFORM_VERSION}  deviceName=${DEVICE_NAME} app=${APP}  automationName=appium  appPackage=com.qmatic.concierge
    Clear Text id=com.qmatic.concierge:id/et_ip
    Input Text     id=com.qmatic.concierge:id/et_ip                X.X.X.X
    Clear Text id=com.qmatic.concierge:id/et_port
    Input Text     id=com.qmatic.concierge:id/et_port       XXXX
    Click Element     id=com.qmatic.concierge:id/btnConnect


I assume, you have a fair knowledge of selenium robot framework and keyword driven development to understand the above script.
You can find the complete keyword documentation here.
Also you can find the complete list of key codes which can be use with keyword "Press Keycode" here.

So, I hope this 
article help beginners who like to acquire some basics of Android automation. Lets meet soon with another technical stuff. have a great day!

{ Read More }


Thursday, August 20, 2015

Mantis Gmail Configuration

Hope you have already read my previous post about Mantis bug tracker. Today, I’m going to show you how to configure gmail in your mantis installation.
Email notification is an important feature of any bug tracker. Once you create, assign, modify or do a status change of a bug, relevant personnel should be notified by an email.
Here is the way you need to do it. Setup the latest Mantis version, i.e, mantisbt-1.2.19. Next, you have to set below configurations.
      
  1. Open the <mantis_installation_dir>\ config_inc.php. Initially it’s look like this.


  2. Default email configurations are placed in <mantis_installation_dir>\ config_default_inc.php. You can overwrite those default settings by adding below configuration snippet to ‘config_inc.php’.
  3. $g_phpMailer_method = PHPMAILER_METHOD_SMTP;
    $g_smtp_host = 'smtp.gmail.com';
    $g_smtp_username = 'yourgmailusername@gmail.com';
    $g_smtp_password = 'yourgmailpassword';
    $g_smtp_connection_mode = 'ssl';
    $g_smtp_port = 465;


  4.       Open the <mantis_installation_dir>\ config_default_inc.php and make sure the following setting is ON.
    $g_enable_email_notification   = ON;

  5. In WAMP, enable the Apache > Apache modules > ssl_module and in php.ini file, uncomment 'extension=php_openssl.dll' setting. (make sure to restart all wamp services to take the effect)

  6. Now the most important part!
    Login to your gmail & go to my account. Under 'Sign-in & security, Click 'Connected apps & sites'. turn on the 'Allow less secure apps:'.


That’s it! Now you are done with Mantis gmail configuration! Good luck!
{ Read More }


Friday, February 20, 2015

Page Object Model | POM using Selenium and C#

Today, I’m going to explain about another famous automation framework. Page Object Model

Fundamental objective of using POM is to arrange the code in a proper order. This reduces the amount of duplicate codes. Also, it improves the readability.

This article is all about a simple demonstration. Let me present. This time we are using C# with Microsoft visual studio. First, install Microsoft Visual Studio and set up the sample demo project. (download here)

Look at the file structure in the solution explorer.

Let me explain the class files in the project.

Common.cs – This is a Class for common operations. This class creates new instance of the remote web driver and set browser capabilities.

DataClass.cs – This Static class gets or sets the string that holds the browser type.

Page.cs – This is the base class for all pages. This class is having methods to handle page navigation, to find elements, to sets text by element name, to set text by xpath, to mouse the over web element, to clicks the element, to gets the element text by xpath, to Sets the drop down value using display text value, to gets the visibility of an element, to gets the radio button value, to gets the color of the text, to get the given attribute value, to sets the drop down value using option value, to getting the selected value of the dropdown, to gets a value indicating whether the element is available, to gets text of elements in dropdown, to gets attribute value list, to gets the title of the current page, to gets a value indicating whether the element is enable, to drag and drop action for web element.. etc.

ReadExcel.cs – This Class contains a method to read excel worksheet.

WebDriverExtentions.cs – This contains Extensions for web driver to find element/elements.

Pages – Here defines all the activities inside a particular page. (Page load, navigation, insert text, click a button.. etc)

Resource – The excel sheet which contains test data and the Xpath file include in this folder.

Tests – All your testcases should include here. This Class contains an Object of the ReadExcel class, Get input data from Excelsheet, Gets or sets the test context and Page navigation.

App.config – This file contains configurations as BaseUrl, ExcelFilePath.

BrowserInput.xml – This file contains BrowserData.

packages.config – This file contains information about packages such as Selenium.WebDriver.

Now, just run (click ‘Run Selected Tests’ under ‘Test Explorer’) and see how it work. That’s all! Time to enjoy your new automation framework!!!
{ Read More }


Blogger news

Blogroll

What's Hot