Pages

Thursday, August 20, 2015

Mantis Gmail Configuration

Hope you have already read my previous post about Mantis bug tracker. Today, I’m going to show you how to configure gmail in your mantis installation.
Email notification is an important feature of any bug tracker. Once you create, assign, modify or do a status change of a bug, relevant personnel should be notified by an email.
Here is the way you need to do it. Setup the latest Mantis version, i.e, mantisbt-1.2.19. Next, you have to set below configurations.
      
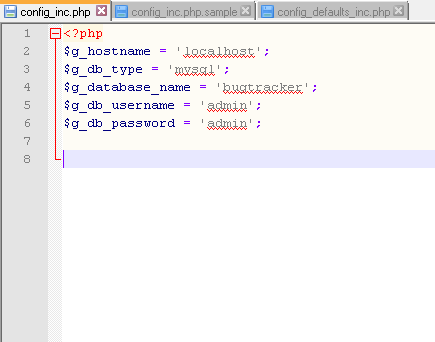
  1. Open the <mantis_installation_dir>\ config_inc.php. Initially it’s look like this.


  2. Default email configurations are placed in <mantis_installation_dir>\ config_default_inc.php. You can overwrite those default settings by adding below configuration snippet to ‘config_inc.php’.
  3. $g_phpMailer_method = PHPMAILER_METHOD_SMTP;
    $g_smtp_host = 'smtp.gmail.com';
    $g_smtp_username = 'yourgmailusername@gmail.com';
    $g_smtp_password = 'yourgmailpassword';
    $g_smtp_connection_mode = 'ssl';
    $g_smtp_port = 465;


  4.       Open the <mantis_installation_dir>\ config_default_inc.php and make sure the following setting is ON.
    $g_enable_email_notification   = ON;

  5. In WAMP, enable the Apache > Apache modules > ssl_module and in php.ini file, uncomment 'extension=php_openssl.dll' setting. (make sure to restart all wamp services to take the effect)

  6. Now the most important part!
    Login to your gmail & go to my account. Under 'Sign-in & security, Click 'Connected apps & sites'. turn on the 'Allow less secure apps:'.


That’s it! Now you are done with Mantis gmail configuration! Good luck!
{ Read More }


Friday, February 20, 2015

Page Object Model | POM using Selenium and C#

Today, I’m going to explain about another famous automation framework. Page Object Model

Fundamental objective of using POM is to arrange the code in a proper order. This reduces the amount of duplicate codes. Also, it improves the readability.

This article is all about a simple demonstration. Let me present. This time we are using C# with Microsoft visual studio. First, install Microsoft Visual Studio and set up the sample demo project. (download here)

Look at the file structure in the solution explorer.

Let me explain the class files in the project.

Common.cs – This is a Class for common operations. This class creates new instance of the remote web driver and set browser capabilities.

DataClass.cs – This Static class gets or sets the string that holds the browser type.

Page.cs – This is the base class for all pages. This class is having methods to handle page navigation, to find elements, to sets text by element name, to set text by xpath, to mouse the over web element, to clicks the element, to gets the element text by xpath, to Sets the drop down value using display text value, to gets the visibility of an element, to gets the radio button value, to gets the color of the text, to get the given attribute value, to sets the drop down value using option value, to getting the selected value of the dropdown, to gets a value indicating whether the element is available, to gets text of elements in dropdown, to gets attribute value list, to gets the title of the current page, to gets a value indicating whether the element is enable, to drag and drop action for web element.. etc.

ReadExcel.cs – This Class contains a method to read excel worksheet.

WebDriverExtentions.cs – This contains Extensions for web driver to find element/elements.

Pages – Here defines all the activities inside a particular page. (Page load, navigation, insert text, click a button.. etc)

Resource – The excel sheet which contains test data and the Xpath file include in this folder.

Tests – All your testcases should include here. This Class contains an Object of the ReadExcel class, Get input data from Excelsheet, Gets or sets the test context and Page navigation.

App.config – This file contains configurations as BaseUrl, ExcelFilePath.

BrowserInput.xml – This file contains BrowserData.

packages.config – This file contains information about packages such as Selenium.WebDriver.

Now, just run (click ‘Run Selected Tests’ under ‘Test Explorer’) and see how it work. That’s all! Time to enjoy your new automation framework!!!
{ Read More }


Blogger news

Blogroll

What's Hot